ODD Customization
This page contains information and links on the basics of producing an ODD file for customizing the TEI guidelines. For a more detailed discussion of this material, see the chapters on “Documentation Elements” and “Using the TEI” in the TEI Guidelines. It might help to think or this page as a cheatsheet from which you can cut-and-paste into your ODD as you work.
This introduction to schema writing shows you how to write an ODD file and generate a RelaxNG schema from that ODD file. You can also write a customized schema using a website maintained by the TEI Consortium called Roma.
Table of Contents:
- Minimum Requirements
- Customizing Elements
- Customizing Attributes on Elements
- Additional Documentation
- Validating against Your Customization
Minimum Requirements for Valid ODD
Getting Started
The easiest way to get started is to open a new file in oXygen and select “ODD Customization[TEI]”. The result is a file with the following declaration and root. You may not need all of the namespace declarations on the <TEI> root element but should feel free to leave them as they come for the time being.
<?xml version="1.0" encoding="UTF-8"?>
<TEI xmlns:xi="http://www.w3.org/2001/XInclude" xmlns:svg="http://www.w3.org/2000/svg"
  xmlns:math="http://www.w3.org/1998/Math/MathML" xmlns="http://www.tei-c.org/ns/1.0">
If you plan to embed Schematron rules into your ODD, see my Schematron page for an additional required namespace declaration.
Header: <teiHeader>
If you have gotten far enough with the TEI to be thinking about writing your own customization, I’m going to assume you understand the basics of the header and what you might want to do with the header in your ODD. Recall that we write ODD customizations in part to document our TEI projects. You will want to include header information that helps readers understand your customization and the reasons it was created.
Naming the Customization: <schemaSpec>
All of the actual customization will go inside the <schemaSpec> element.
<schemaSpec ident="[add name of your customization]" start="TEI">
    <moduleRef key="header"/>
    <moduleRef key="core"/>
    <moduleRef key="tei"/>
    <moduleRef key="textstructure"/>
</schemaSpec>
Including/Excluding Elements: <moduleRef>
The <moduleRef> element allows you to specify which elements you will include in your customization. You use the @key attribute to name the modules you want to include. You may include all 22 modules but you must at least include the four required modules shown here.
<schemaSpec ident="[add name of your customization]" start="TEI">
    <moduleRef key="header"/>
    <moduleRef key="core" include="title"/>
    <moduleRef key="tei"/>
    <moduleRef key="textstructure" except="div1 div2 div3 div4 div5 div6 div7"/>
</schemaSpec>
In addition to the @key attribute, the <moduleRef> element takes @include and @except attributes. The @include attribute specifies the elements from that particular module that will be included in the customization while the @except attribute indicates that all of the elements from that module will be allowed in the customization except the ones listed. Leaving off @include and @except simply brings over into your customization all of the elements that are a part of the module indicated.
Customizing Elements
Identifying and Modifying Elements: <elementSpec>
The <elementSpec> is used to make modifications to an element. These modifications can include changes to content models, deleting attributes from an element, or constraining attribute values for project specific needs.
<elementSpec module="[add]" ident="[add]" mode="[add]">
    ...
</elementSpec>
-
@module: The use of the @module attribute here might seem unnecessary but you should always use it. It is required if you will process your ODD into RelaxNG using Roma. You can find the TEI module that an element is part of in the TEI guidelines.
-
@ident: The @ident attribute takes the name of the element you want to modify.
-
@mode: The @mode attribute indicates what you would like to do in modifying the element. The acceptable values are “add”, “delete”, “change”, and “replace”.
- add: Use this value to define a new element. I recommend that you focus your TEI customization on specifying a subset of the TEI P5 All that you wish to use rather than creating new elements (or attributes). If you choose to add an element, this is how you would do it.
- delete: Use this value to remove an element from the customization.
- change: Use this value to modify how an element functions in your customization. This is the value I use most often and the option I would recommend for those starting new to ODD customization.
- replace: Use this to replace the TEI specifications for the given TEI element. As with “add” above, this customization will take you out of the realm of specifying subset of the TEI P5 All and into the realm of dramatically changing how a defined TEI element should work.
For more on <elementSpec>, see the TEI Guidelines.
Child Elements: <content>
By customizing the content of an element you state which elements may appear as children of that element. A self-closing <empty> element inside <content> means that no elements may appear. If the aim of the customization is to specify which elements can appear, use <textNode> and <elementRef> elements.
<elementSpec ident="sponsor" module="header" mode="change">
    <content>
        <textNode/>
    </content>
</elementSpec>
The customization above would indicate that the only acceptable child node for a <sponsor> element is a text node.
<elementSpec ident="editionStmt" module="header" mode="change">
    <content>
        <elementRef key="edition" minOccurs="1" maxOccurs="1"/>
    </content>
</elementSpec>
The customization above would indicate that the only acceptable child node for an <editionStmt> element is an <edition> element. Additionally, the use of @minOccurs and @maxOccurs indicates that this <edition> can only appear once.
Ordering Child Elements
Note that using multiple <elementRef> elements will result in the requirement that the elements appear in the order in which they are listed.
<elementSpec ident="place" module="namesdates" mode="change">
    <content>
        <elementRef key="placeName" minOccurs="1" maxOccurs="unbounded"/>
        <elementRef key="desc" minOccurs="1" maxOccurs="unbounded"/>
        <elementRef key="location" minOccurs="0" maxOccurs="unbounded"/>
        <elementRef key="event" minOccurs="0" maxOccurs="unbounded"/>
    </content>
</elementSpec>
If you want an un-ordered set of elements or if you simply want to be more intentional about element order, you can put your <elementRef> elements inside a <sequence> element with a @preserveOrder attribute. In the example below, if the value of the @preserveOrder attribute is “true,” then the customization functions the same as the example above. If “false,” then the elements listed can appear in any order.
<elementSpec ident="place" module="namesdates" mode="change">
    <content>
        <sequence preserveOrder="[true|false]">
            <elementRef key="placeName" minOccurs="1" maxOccurs="unbounded"/>
            <elementRef key="desc" minOccurs="1" maxOccurs="unbounded"/>
            <elementRef key="location" minOccurs="0" maxOccurs="unbounded"/>
            <elementRef key="event" minOccurs="0" maxOccurs="unbounded"/>
        </sequence>
    </content>
</elementSpec>
Note that <sequence> without a @preserveOrder attribute has a default value equivalent to including the attribute with a value of “false.” In general, I find it best to err on the side of specificity and put <elementRef> elements inside <sequence> along with a @preserveOrder attribute.
Note as well that <elementRef> without @minOccurs and @maxOccurs has default values for those attributes of “1”. In other words, not indicating your desired values for @minOccurs and @maxOccurs means that they will be required to appear one and only one time.
Where <sequence> allows you to indicate what elements can appear in a given context and whether or not they must appear in order, the <alternate> elements allows you to specify that one (and only one) of several elements appear. In the example below, the <editor> element must contain either a <persName> element or a text node but it cannot contain both.
<elementSpec ident="editor" module="core" mode="change">
    <content>
        <alternate>
            <elementRef key="persName"/>
            <textNode/>
        </alternate>
    </content>
</elementSpec>
Your customization can also combine the use of <sequence> and <alternate>. In the example below, the customization requires a sequence with a preserved order. However, the second element in that sequence can be either <orgName> or <name> but not both.
<elementSpec ident="respStmt" module="header" mode="change">
    <content>
        <sequence preserveOrder="true">
            <elementRef key="resp" minOccurs="1" maxOccurs="1"/>
            <alternate>
                <elementRef key="orgName" minOccurs="1" maxOccurs="1"/>
                <elementRef key="name" minOccurs="1" maxOccurs="1"/>
            </alternate>
        </sequence>
    </content>
</elementSpec>
In this example from the TEI guidelines, the customization permits any one (and only one) of the three sequences.
<content>
    <alternate>
        <sequence>
            <elementRef key="sic"/>
            <elementRef key="corr"/>
        </sequence>
        <sequence>
            <elementRef key="orig"/>
            <elementRef key="reg"/>
        </sequence>
        <sequence>
            <elementRef key="abbr"/>
            <elementRef key="expan"/>
        </sequence>
    </alternate>
</content>
Customizing Attributes on Elements
The discussion that follows will focus on how to constrain attributes and attribute values in your ODD. Recall that TEI elements are associated with attribute classes. We won’t cover making changes to attribute classes here but you might want to be aware that you can customize attribute classes and add/remove elements to/from classes.
You can see the discussion of attribute values on <elementSpec> above. The <attList> element allows you to customize the attributes that may appear on an element. The <desc> element, which is optional, allows you to provide prose documentation about this attribute customization.
Identifying and Modifying Attributes: <attDef>
The customization really begins on the <attDef> element.
- The @ident attribute identifies the attribute being customized.
- The @mode attribute indicates what action you are performing in the
customization.
- add: Use this value to allow an attribute where the TEI does not allow it.
- change: Use this value to change how an attribute already allowed on this element by the TEI can be used. This will be the most customization. This is what allows you to create and enforce a closed list of attribute values for your project.
- The @usage attribute indicates whether or not the attribute is required.
- opt: optional
- rec: recommended
- req: required
<elementSpec ident="[add]" mode="change" module="[add]">
    <attList>
	    <desc>[add]</desc>
        <attDef ident="[add]" mode="[add|change]" usage="[opt|rec|req]">
            ...
        </attDef>
    </attList>
</elementSpec>
Datatypes: <datatype>
Datatypes are used by the TEI to constrain attribute values. Datatypes are used to require things like a 4-digit year on a @when attribute. You can do much more with datatypes in your customization but we will focus here on requiring a set of attribute values. You can read up on datatypes in the TEI Guidelines. When customizing to require a closed list of attribute values, you want to use “data.enumerated” as the value of the @key attribute.
<attDef ident="[add]" mode="[add|change]" usage="[opt|rec|req]">
    <datatype>
        <dataRef key="data.enumerated"/>
    </datatype>
	...
</attDef>
Attribute Values: <valItem>
The following customization requires (usage=”req” on <attDef>) a closed list of attribute values for the @status attribute on the <revisionDesc> element. The value is indicated by the value of the @ident attribute. The <gloss> element appears in the auto-complete feature in oXygen and can be very valuable for encoders. The <desc> element provides prose documentation for how your project understands the attribute values.
<elementSpec ident="revisionDesc" module="header" mode="change">
    <attList>
        <attDef ident="status" mode="change" usage="req">
            <datatype>
                <dataRef key="data.enumerated"/>
            </datatype>
			<valList type="closed">
                <valItem ident="draft">
                    <gloss>draft</gloss>
                    <desc>Indicates that this document is more-or-less complete but remains in draft status.</desc>
                </valItem>
                <valItem ident="incomplete">
                    <gloss>incomplete</gloss>
                    <desc>Indicates that this document is incomplete.</desc>
                </valItem>
                <valItem ident="published">
                    <gloss>published</gloss>
                    <desc>Indicates that this document has been published.</desc>
                </valItem>
                <valItem ident="underReview">
                    <gloss>under review</gloss>
                    <desc>Indicates that this document is under review by one or more editors.</desc>
                </valItem>
            </valList>
        </attDef>
    </attList>
</elementSpec>
Additional Documentation
Documentation with <exemplum>
The <exemplum> element allows you to include code snippets from your project in order to document your usage of an element and show encoders how to encode according to your schema. Note that you must also include the <egXML> element with @xmlns attribute and value from the example below.
<elementSpec ident="title" module="core" mode="change">
          ...
    <exemplum>
        <egXML xmlns="http://www.tei-c.org/ns/Examples">
            <title level="a" xml:lang="en">Edessa — <foreign xml:lang="syr">ܐܘܪܗܝ</foreign>
            </title>
        </egXML>
    </exemplum>
    <exemplum>
        <egXML xmlns="http://www.tei-c.org/ns/Examples">
            <title level="m" xml:lang="en">The Syriac Gazetteer</title>
        </egXML>
    </exemplum>
</elementSpec>
Documentation with <remarks>
The <remarks> element take a child <p> element with a prose description of the customization for that element.
<elementSpec ident="date" module="core" mode="change">
    ...
    <remarks versionDate="2016-11-24">
        <p>A <gi>date</gi> elment includes both a machine-readable version (using attributes like
        <att>when</att>, <att>notBefore</att>, <att>notAfter</att>) and a human-readable
        version as text in the element content. See <ref
        target="http://syriaca.org/exist/apps/srophe/documentation/dates.html">the
        Syriaca.org documentation</ref> for editorial conventions regarding dates.</p>
    </remarks>
</elementSpec>
Validating against Your Customization
The ODD file is where you write your customization of the TEI schema. In order to validate a TEI document against an actual schema you will need to generate RelaxNG out of your ODD. You can do that in oXygen, which we will discuss below, or by using Roma.
Generating RelaxNG
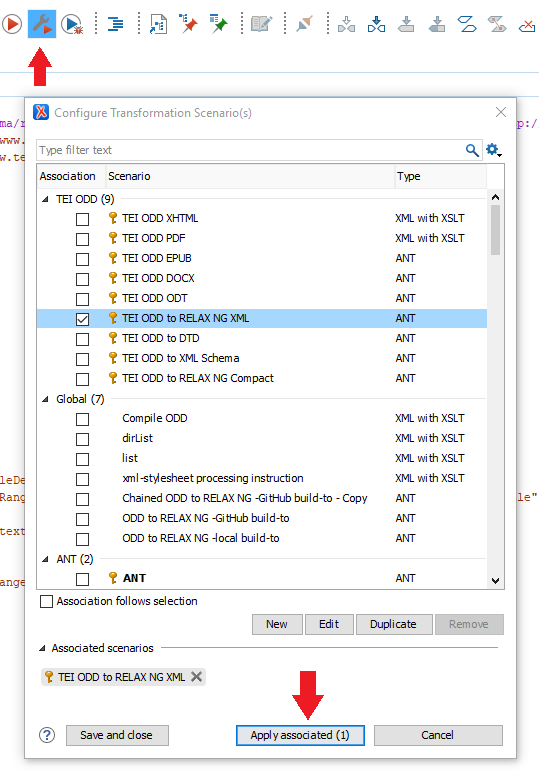
Generate RelaxNG in oXygen by selecting the wrench/arrow button, navigate to the
TEI ODD section, and select “TEI ODD to RELAX NG XML.” Then select “Apply associated”
at the bottom. This will create an “out” folder and place the RelaxNG file there.
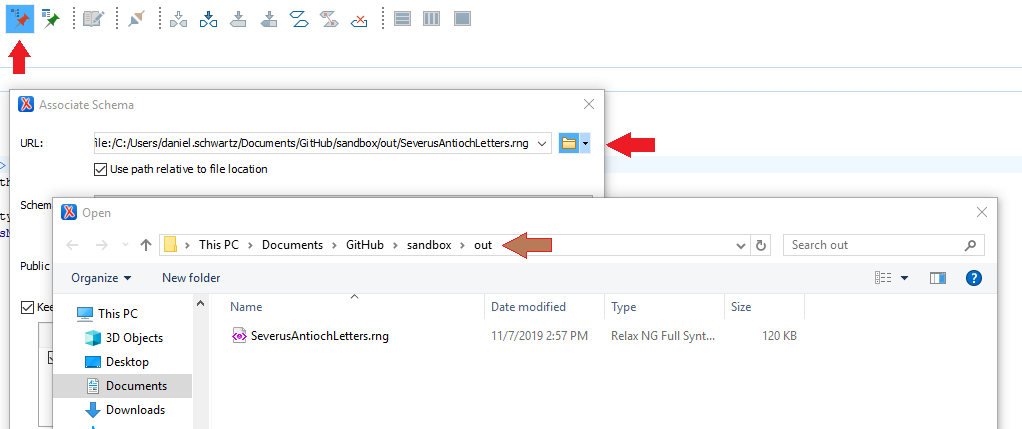
Associating Your TEI with Your RelaxNG Schema
Now that you have a RelaxNG schema generated out of your ODD, you will need to
associate your TEI file with that ODD. With your TEI file open in oXygen you can do
this by selecting the red push-pin button. In the URL box you have one of two
options. You can use a path relative to the location of your TEI file, as in
the example below. Alternatively, you can point to the RelaxNG file on the web.
In the example below you would un-check the relative path button and put in
the link to the “raw” GitHub file: https://raw.githubusercontent.com/dlschwartz/sandbox/master/out/SeverusAntiochLetters.rng.
Acknowledgements
This page draws upon the following sources:
- The TEI Guidelines
- Syd Bauman and Julia Flanders, “Overview of TEI Customization.”